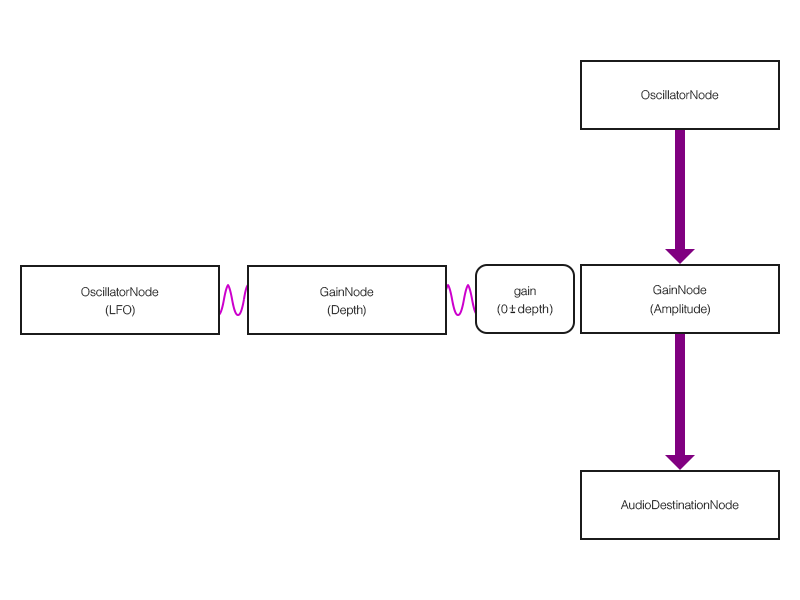
トレモロは振幅 (音の大きさ) を周期的に変化させることによって, 実装することができます.
すなわち, LFOをAudioParamインスタンスであるGainNodeインスタンスのgainプロパティに接続することによって,
音の大きさ (振幅) を周期的に変化させることができます.
ちなみに, トレモロはインサート型のエフェクトであり, 出力される音はエフェクト音のみです.
トレモロの実装は以下の2つ処理に分解可能となります.
- 振幅 (音の大きさ) を周期的に変化させる
- LFOをAudioParamインスタンスであるGainNodeインスタンスのgainプロパティに接続する
- エフェクト音のみを出力する
- 入力ノードと出力ノード (AudioDestinationNode) の間に, トレモロのためのGainNodeを接続する
サンプルコード 01
window.AudioContext = window.AudioContext || window.webkitAudioContext;

// Create the instance of AudioContext
var context = new AudioContext();

// for legacy browsers
context.createDelay = context.createDelay || context.createDelayNode;

// Create the instance of OscillatorNode
var oscillator = context.createOscillator();  // for Input
var lfo        = context.createOscillator();  // for LFO

// for legacy browsers
oscillator.start = oscillator.start || oscillator.noteOn;
oscillator.stop  = oscillator.stop  || oscillator.noteOff;
lfo.start        = lfo.start        || lfo.noteOn;
lfo.stop         = lfo.stop         || lfo.noteOff;

// for legacy browsers
context.createGain = context.createGain || context.createGainNode;

// Create the instance of GainNode
var amplitude = context.createGain();  // for Tremolo
var depth     = context.createGain();  // for LFO

// Connect nodes for effect (Tremolo) sound
// OscillatorNode (Input) -> GainNode (Amplitude) -> AudioDestinationNode (Output)
oscillator.connect(amplitude);
amplitude.connect(context.destination);

// Connect nodes for LFO that changes Amplitude periodically
// OscillatorNode (LFO) -> GainNode (Depth) -> gain (GainNode)
lfo.connect(depth);
depth.connect(amplitude.gain);

図2 - 5 - a. トレモロのノード接続
トレモロはエフェクト音のみを出力するインサート型エフェクトです.
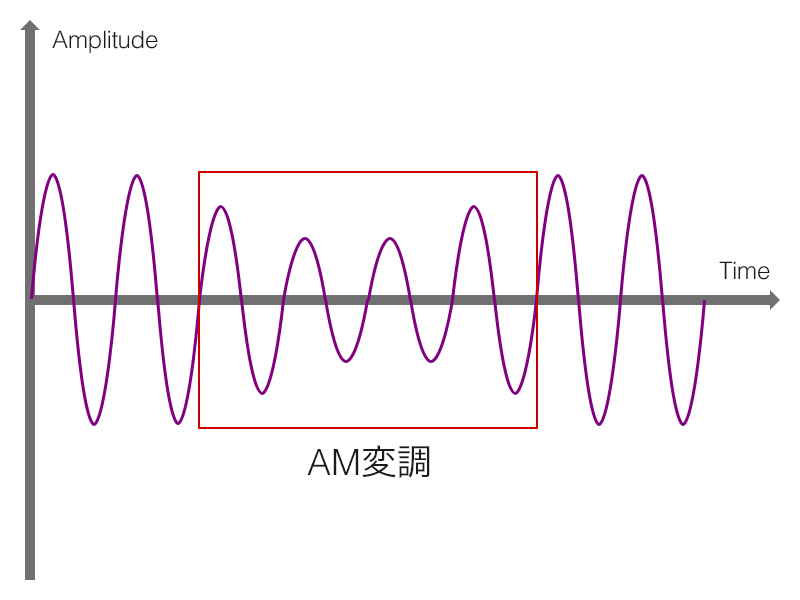
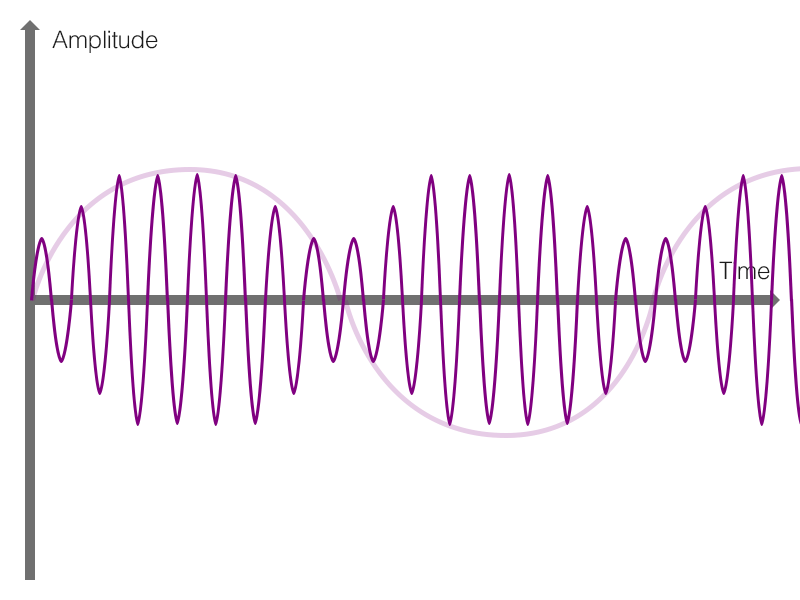
トレモロは, 1を基準に値が変化するように定義されています (図2 - 5 - b).
そして, その基準値をもとにゲイン (GainNodeインスタンスのgainプロパティ) が負数にならないように, LFOのDepthの範囲は0 〜 1となります.
a(n) = 1 + depth \cdot \sin \left(\frac{2{\pi} \cdot rate \cdot n}{f_s}\right)
図2 - 5 - b. トレモロの定義
サンプルコード 02
/*
 * Add code to sample code 01
 */

// ....

// Set Base Value
amplitude.gain.value = 1;  // 1 +- Depth

// Set Depth
depth.gain.value = 0.5;  // 1 +- 0.5

// Set Rate
lfo.frequency.value = 5;  // 5 Hz
ところで, トレモロのようなインサート型エフェクトの場合,
センド・リターン型エフェクトのように, エフェクトのON / OFFの切り替えにおいて,
エフェクト音の調整のためのGainNodeをコントロールすることによって, 原音のみを出力するという方法が使えません
(インサート型は, エフェクト音のみの出力であるからです).
したがって, エフェクトのON / OFFの切り替えに応じて,
ノード接続を変更する必要があります.
サンプルコード 03
/*
 * sample code 01
 */

// ....

// Clear connection
oscillator.disconnect(0);
amplitude.disconnect(0);

var toggleButton = document.createElement('input');

toggleButton.setAttribute('type',    'checkbox');
toggleButton.setAttribute('checked', 'checked');

document.body.appendChild(toggleButton);

if (toggleButton.checked) {
    // Tremolo ON

    // Connect nodes for effect (Tremolo) sound
    // OscillatorNode (Input) -> GainNode (Amplitude) -> AudioDestinationNode (Output)
    oscillator.connect(amplitude);
    amplitude.connect(context.destination);
} else {
    // Tremolo OFF

    // Connect nodes for original sound
    // OscillatorNode (Input) -> AudioDestinationNode (Output)
    oscillator.connect(context.destination);
}
最後にまとめのコードを記載します.
サンプルコード 04
window.AudioContext = window.AudioContext || window.webkitAudioContext;

// Create the instance of AudioContext
var context = new AudioContext();

// for legacy browsers
context.createDelay = context.createDelay || context.createDelayNode;

// Create the instance of OscillatorNode
var oscillator = context.createOscillator();  // for Input
var lfo        = context.createOscillator();  // for LFO

// for legacy browsers
oscillator.start = oscillator.start || oscillator.noteOn;
oscillator.stop  = oscillator.stop  || oscillator.noteOff;
lfo.start        = lfo.start        || lfo.noteOn;
lfo.stop         = lfo.stop         || lfo.noteOff;

// for legacy browsers
context.createGain = context.createGain || context.createGainNode;

// Create the instance of GainNode
var amplitude = context.createGain();  // for Tremolo
var depth     = context.createGain();  // for LFO

// Clear connection
oscillator.disconnect(0);
amplitude.disconnect(0);

var toggleButton = document.createElement('input');

toggleButton.setAttribute('type',    'checkbox');
toggleButton.setAttribute('checked', 'checked');

document.body.appendChild(toggleButton);

if (toggleButton.checked) {
    // Tremolo ON

    // Connect nodes for effect (Tremolo) sound
    // OscillatorNode (Input) -> GainNode (Amplitude) -> AudioDestinationNode (Output)
    oscillator.connect(amplitude);
    amplitude.connect(context.destination);
} else {
    // Tremolo OFF

    // Connect nodes for original sound
    // OscillatorNode (Input) -> AudioDestinationNode (Output)
    oscillator.connect(context.destination);
}

// Connect nodes for LFO that changes Amplitude periodically
// OscillatorNode (LFO) -> GainNode (Depth) -> gain (GainNode)
lfo.connect(depth);
depth.connect(amplitude.gain);

// Set Base Value
amplitude.gain.value = 1;  // 1 +- Depth

// Set Depth
depth.gain.value = 0.5;  // 1 +- 0.5

// Set Rate
lfo.frequency.value = 5;  // 5 Hz

// Start sound
oscillator.start(0);

// Effector (Tremolo) ON
lfo.start(0);

図2 - 5 - c. トレモロのノード接続 (切り替え)
トレモロのようなインサート型のエフェクトでは, ノード接続を切り替えることで, エフェクトのON / OFFを切り替えます.
以上でトレモロが完成しました. さっそく, デモ 12・デモ 13で試してみてください.
基本となるLFOのDepth / Rateに追加して, LFOの波形タイプも設定可能にしました.
これらのパラメータを組み合わせてお好みのトレモロを発見してください.
デモ 12 (サウンド)
デモ 13 (オーディオ)